Scan Your Entire Network with Angry IP Scanner
A fast, lightweight IP address and port scanner for Windows, macOS, and Linux. Find active hosts, open ports, and network details in seconds.
System Requirements
Angry IP Scanner is lightweight and runs on almost any hardware. Here is what you need.
| Component | Minimum | Recommended |
|---|---|---|
| Operating System | Windows 7 (64-bit) | Windows 10 or 11 |
| macOS | macOS 10.14 Mojave (Intel) | macOS 12+ (Apple Silicon native) |
| Linux | Any distro with x86_64 or ARM64 | Ubuntu 22.04+ / Fedora 38+ |
| Processor | 1 GHz single-core | 2 GHz dual-core or faster |
| RAM | 512 MB | 2 GB or more |
| Disk Space | 10 MB (standalone .exe) | 100 MB (installer with bundled Java) |
| Display | 1024 x 768 | 1280 x 800 or higher |
| Java Runtime | Java 17 (bundled in installer) | Java 21 LTS (for .jar users) |
| Network | Any active network adapter | Ethernet or Wi-Fi with admin/root access |
What Is Angry IP Scanner?
A lightweight, cross-platform network scanner built for speed and simplicity. Used by sysadmins, security professionals, and home users worldwide.
The Go-To Network Scanner Since 2001
Angry IP Scanner is a free, open-source tool that scans IP addresses and ports on any network. Type in an IP range, hit Start, and within seconds you get a color-coded list of every active host, its hostname, open ports, MAC address, and NetBIOS details. No configuration wizards, no setup overhead – it just works out of the box.
Created by Anton Keks (co-founder of Codeborne), the project has been actively maintained for over two decades and currently sits at version 3.9.3. Built in Java with SWT for the interface, it runs natively on Windows, macOS (Intel and Apple Silicon), and Linux without needing a separate Java installation – the bundled installer handles that automatically.
Who Actually Uses It?
Network administrators use Angry IP Scanner to audit subnets, locate rogue devices, and verify firewall rules. Security teams rely on it for quick reconnaissance during penetration testing or incident response. Home users fire it up when they want to see what devices are connected to their Wi-Fi or troubleshoot connectivity problems. Its portability matters here: the standalone .exe or .jar file runs from a USB stick with zero installation, which makes it a staple in many IT toolkits.
The scanner supports multithreaded pinging (hundreds of threads in parallel), which is why it finishes full /24 subnet scans in under a minute. Results export to CSV, TXT, XML, or IP-Port list formats for further analysis. A plugin system lets power users collect additional data points beyond the defaults, and you can save favorite IP ranges for repeated scans.
Compared to tools like Nmap or Advanced IP Scanner, Angry IP Scanner trades scripting power for raw simplicity. If you need a quick, visual scan without writing commands, grab the latest version and try it yourself.
Key Features
Angry IP Scanner packs serious network scanning power into a portable, zero-config tool. Here is what it actually does.
Multithreaded IP Scanning
Angry IP Scanner creates a separate scanning thread for each IP address, so it can probe hundreds of hosts per second. A full /24 subnet (256 addresses) typically finishes in under 10 seconds. Larger ranges like /16 blocks are practical too, since you can configure the thread count to match your hardware.
Port Scanning
Specify individual ports, comma-separated lists, or full ranges. Angry IP Scanner checks which ports are open on each discovered host and displays results inline. Useful for finding web servers, SSH endpoints, or rogue services running on unexpected ports.
Ping-Based Host Discovery
Before doing any deeper inspection, the scanner pings each address to check if anything responds. This pre-filter means it only spends time on live hosts. Dead addresses get flagged red and skipped from further processing.
Hostname Resolution
Every discovered IP gets a reverse DNS lookup. Instead of staring at raw addresses, you see names like “nas-storage.local” or “printer-2f” alongside the IP. This makes it much easier to identify devices on busy networks.
MAC Address Detection
For hosts on the local subnet, Angry IP Scanner reads the MAC address from ARP tables. You can use this to identify device manufacturers (the first three octets map to a vendor) or track hardware across IP changes.
NetBIOS Information
On Windows networks, the scanner pulls NetBIOS data: computer name, workgroup or domain, and the currently logged-in user. Handy for mapping out which machines belong to which departments without touching Active Directory.
Plugin Architecture
Need to collect data beyond the defaults? The plugin system (called “fetchers”) lets you write Java classes that gather custom information for each host. The community has built fetchers for HTTP headers, SNMP data, and more. You can also write your own without modifying the core application.
Export to CSV, TXT, XML
Scan results export to CSV, plain text, XML, or IP-port list format. Feed the output into spreadsheets, monitoring scripts, or asset management tools. The IP-port list format works particularly well with other security tools that accept target lists.
Favorites for IP Ranges
Save frequently scanned ranges as favorites. If you manage multiple subnets or regularly audit the same network segments, you can switch between saved ranges in two clicks instead of retyping addresses each time.
Web Server Detection
When port 80 or 443 is open, Angry IP Scanner can detect the web server type. Right-click any host to open it directly in your browser. This is useful for quickly auditing which devices on a network are running HTTP services.
Cross-Platform and Portable
Runs on Windows, macOS (Intel and Apple Silicon), and Linux. The Windows version comes as a standalone .exe that needs no installation. Just download and run. Built on Java 17+, but the installer bundles a JRE so you do not need Java pre-installed.
All features are free and open source under GPLv2. No premium tiers, no feature gates.
Download Angry IP Scanner
Grab the latest version for your operating system. All downloads come directly from the official GitHub repository.
Cross-Platform JAR
Works on any OS with Java 17 or later. Portable and lightweight – just double-click to run.
Current version: 3.9.3 (released November 10, 2025). The Windows installer bundles Java 17, so you don’t need to install Java separately. The standalone EXE and JAR files require Java 17+ already on your system. Source code is available on GitHub.
Screenshots
See Angry IP Scanner in action across Windows, macOS, and Linux. The interface stays consistent on every platform.
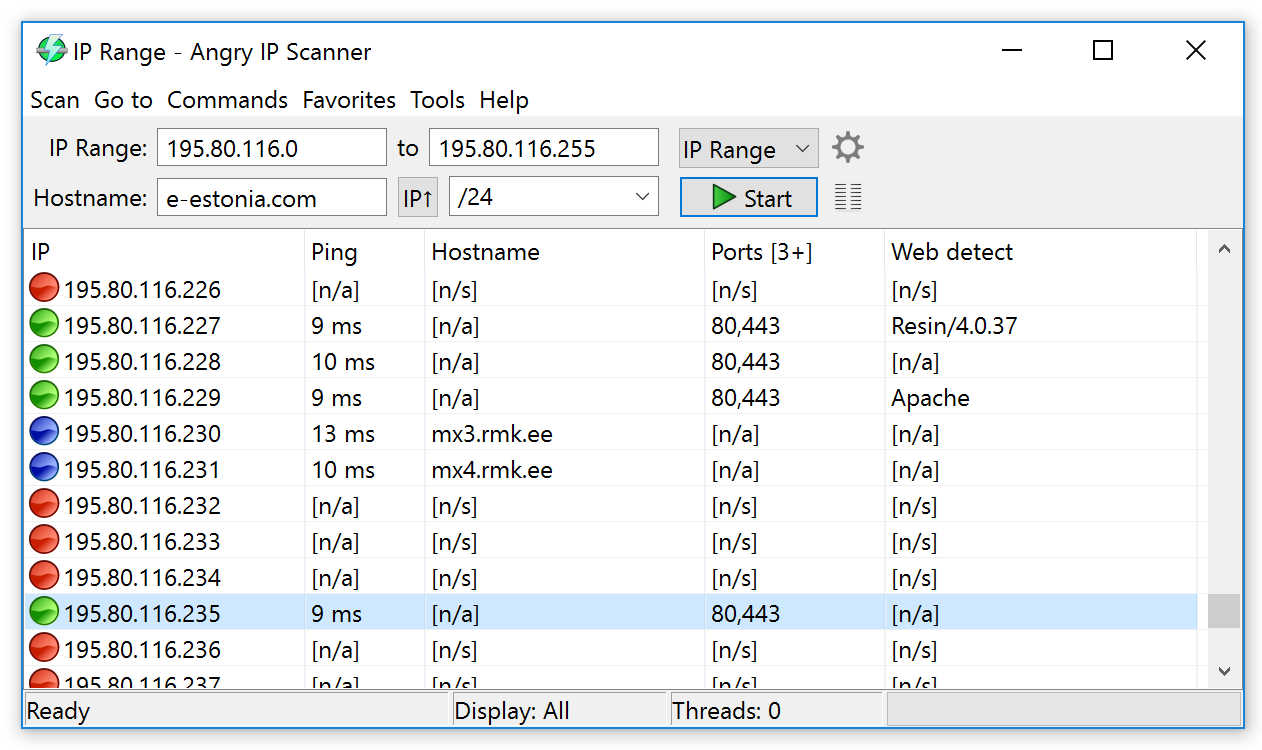
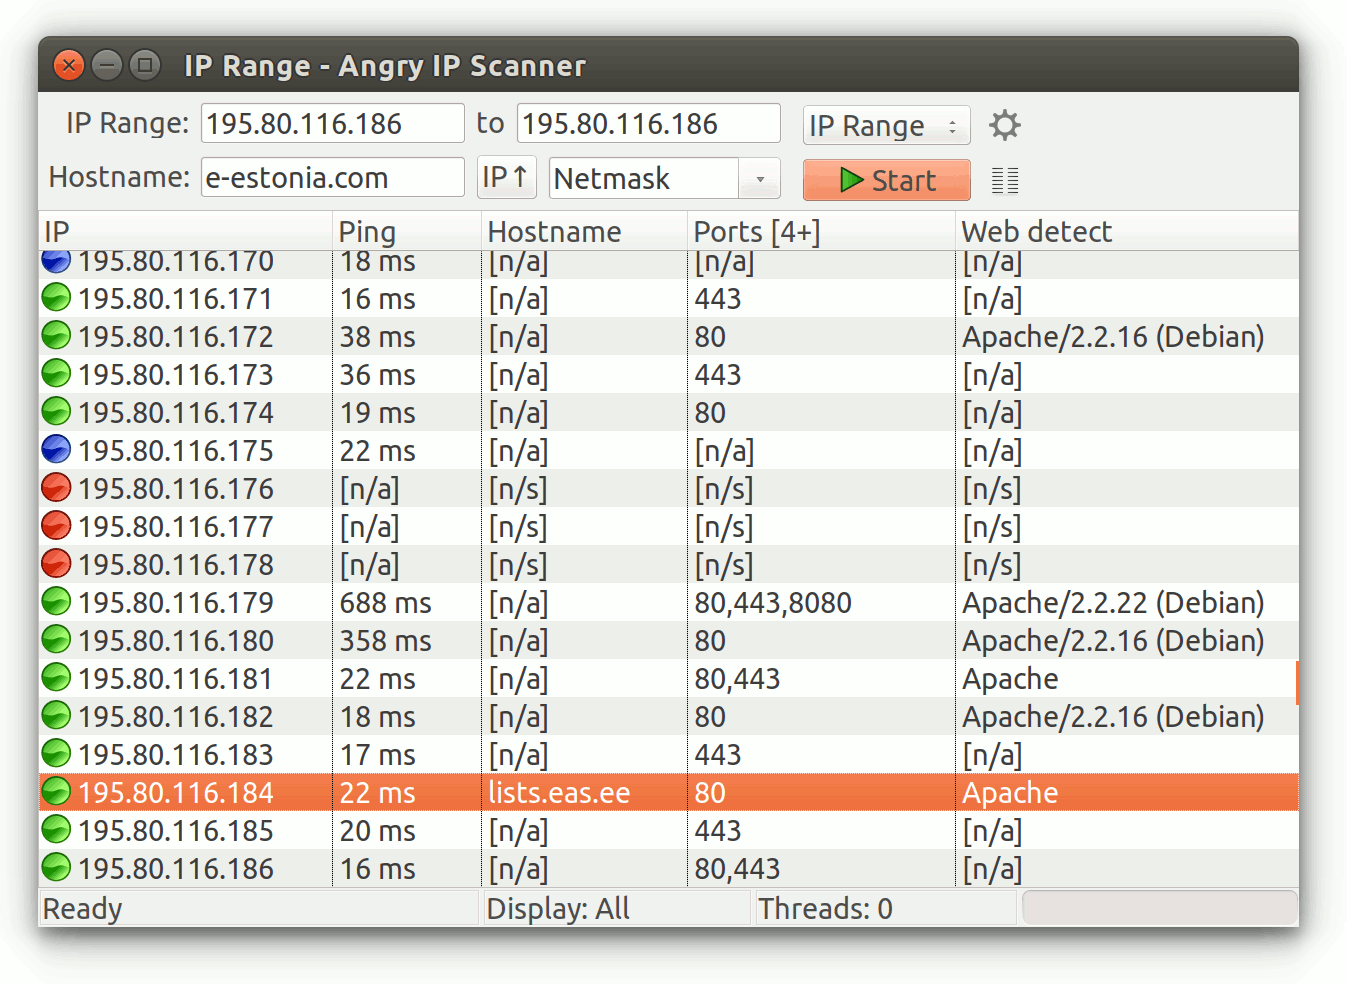
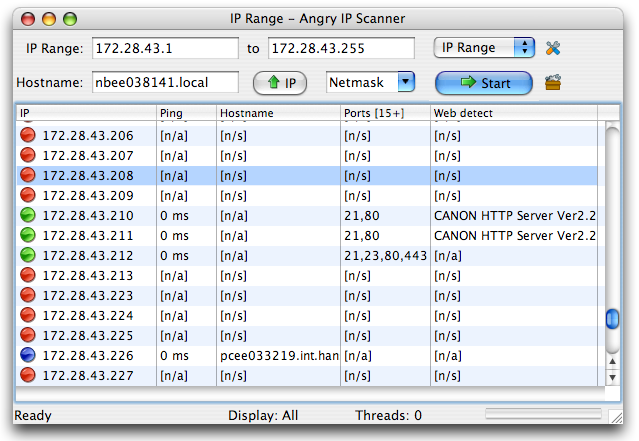
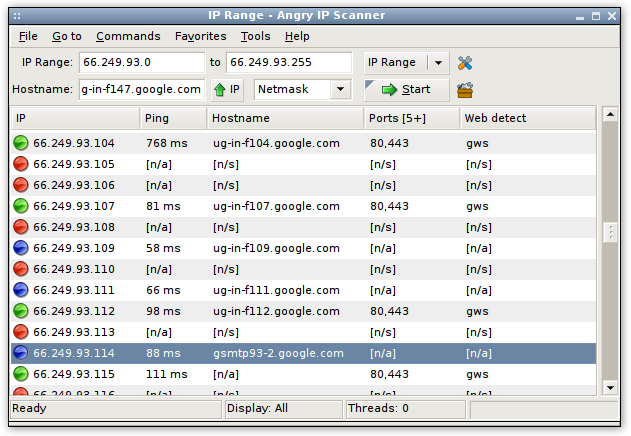
Click any screenshot to view full size. All images from the official Angry IP Scanner project.
Getting Started with Angry IP Scanner
From download to your first network scan in under five minutes. Here is everything you need to know to get Angry IP Scanner running on your machine.
Downloading Angry IP Scanner
Head to our download section above to grab the latest version of Angry IP Scanner (currently v3.9.3). You will find packages for Windows, macOS, and Linux—pick the one that matches your operating system.
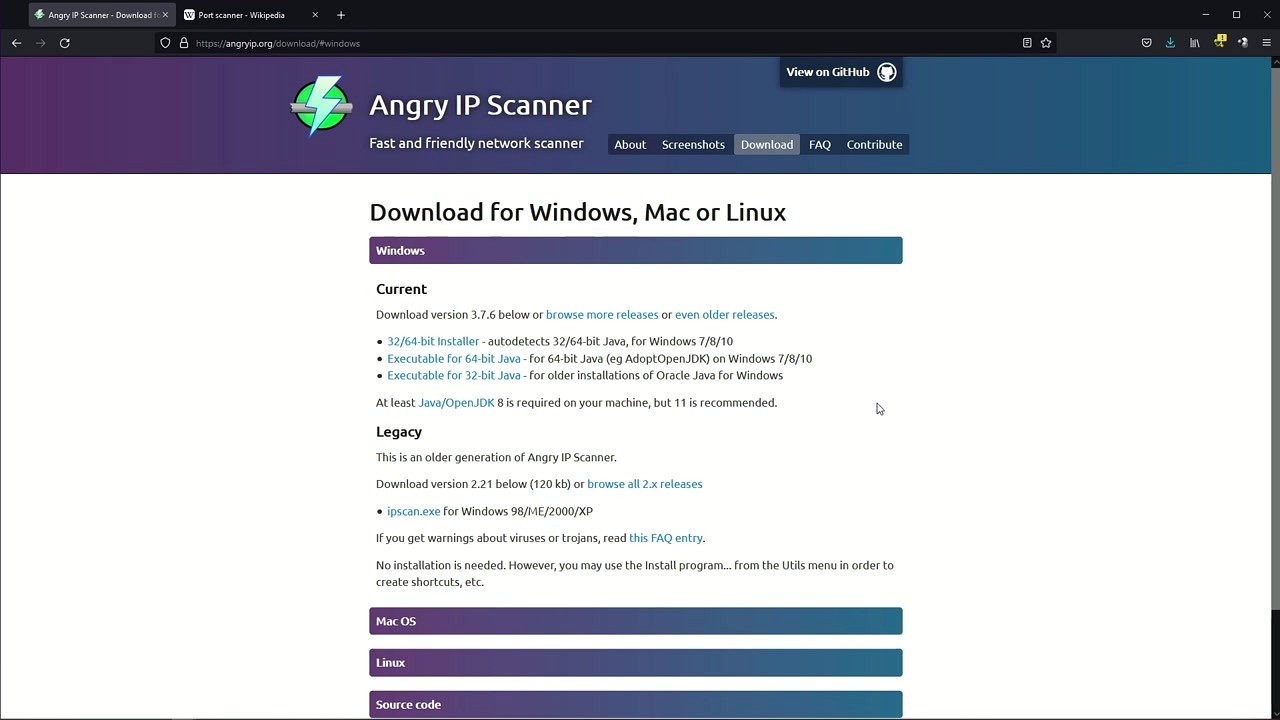
Which download should you pick?
- Windows Installer (.exe, ~45 MB) – The easiest option for most users. It bundles Java 17 so you do not need to install anything else. Just run the .exe and follow the prompts.
- Windows Standalone (.exe, ~45 MB) – A portable version. No installation required. Drop it anywhere on your drive and double-click to launch. Great for USB drives or shared computers where you cannot install software.
- macOS (.zip) – Available for both Apple Silicon (M1/M2/M3/M4) and Intel Macs. Download the right one for your chip. Not sure? Click the Apple menu, then “About This Mac” to check.
- Linux (.deb / .rpm) – Debian/Ubuntu users grab the .deb package. Fedora/RHEL users grab the .rpm. There is also a universal .deb that works on any architecture, though the x64-specific package is faster.
- Cross-platform JAR – If you already have Java 17+ installed, this single .jar file runs on any OS. Smallest download at about 2 MB.
If you are unsure, go with the Windows Installer on Windows or the platform-specific .zip on Mac. The download takes under a minute on most connections.
Installation Walkthrough
Windows
- Double-click
ipscan-3.9.3-setup.exe. If Windows SmartScreen pops up with “Windows protected your PC,” click More info, then Run anyway. The file is safe—it is a signed open-source release from GitHub. - The installer opens a standard wizard. Accept the license agreement (GPLv2). The default install path is
C:Program FilesAngry IP Scanner. Change it if you want, but the default works fine. - On the components screen, keep “Desktop Shortcut” checked if you want quick access. No bundled toolbars or third-party software to watch out for here—Angry IP Scanner is clean.
- Click Install. The process takes about 10 seconds. Java is included in the installer, so you do not need a separate Java download.
- Click Finish and the app launches automatically.
macOS
- Unzip the downloaded file. You will get an
Angry IP Scanner.appbundle. - Drag it into your Applications folder.
- On first launch, macOS may block it because it is from an “unidentified developer.” Right-click the app, select Open, then click Open again on the dialog. You only need to do this once.
- macOS will also ask for permission to accept incoming network connections. Click Allow—this is needed for the scanner to receive ping responses.
Linux
On Debian/Ubuntu, open a terminal and run:
On Fedora/RHEL:
Once installed, search for “Angry IP Scanner” in your application launcher, or type ipscan in the terminal.
java -jar ipscan-any-3.9.3.jar. You will need Java 17 or newer installed separately.Initial Setup and Configuration
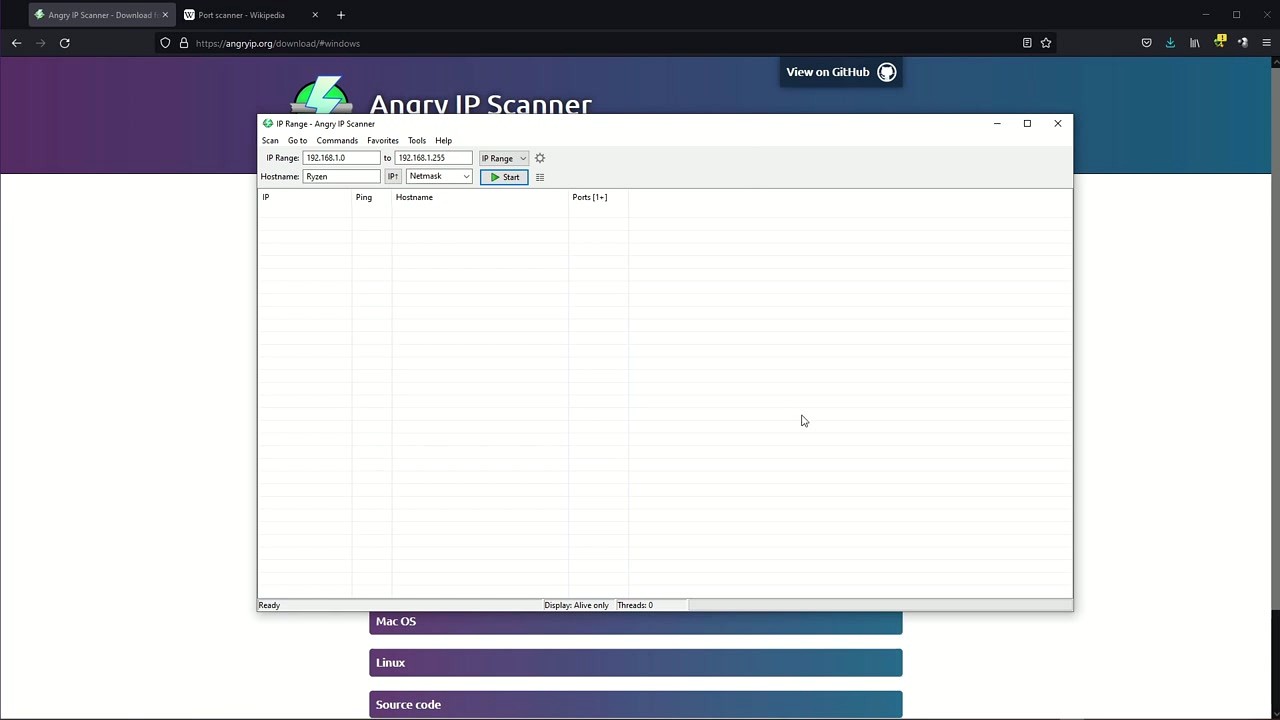
When Angry IP Scanner opens for the first time on Windows, it runs a quick “Getting Started” detection. This takes a few seconds—it tests your system to figure out the best number of threads and timeout values for your network. Let it finish. These auto-detected settings work well for most home and office networks.
After that, you see the main window. It is split into a few parts:
- IP Range fields at the top (From / To) – pre-filled with your local subnet range
- Hostname field below that, showing your computer name
- A green Start button to kick off scans
- A results table with columns for IP, Ping, Hostname, and Ports
- A status bar at the bottom showing thread count and display mode
Settings worth changing
Go to Tools > Preferences (or press Ctrl+Shift+P) to open the settings dialog. Here is what to look at:
- Scanning tab – The “Max threads” value controls how many IPs get scanned at once. The default (usually around 200-500) is fine for home networks. If you are scanning a large corporate network, bump it up to 1000. On slow connections, drop it to 100.
- Scanning tab > Pinging method – “Combined UDP+TCP” works best on Windows. On Linux, switch to “ICMP Echo” if you are running as root.
- Ports tab – By default, the scanner does not scan any ports. Add common ones like
22,80,443,3389,8080to the “Port Selection” field to get useful data right away. - Display tab – Set “Display” to “Alive hosts only” if you do not want dead IPs cluttering your results. You can also change this from the status bar dropdown.
Adding data fetchers
Angry IP Scanner can pull more than just ping and hostname. Go to Tools > Fetchers to see what is available. The left panel shows active fetchers; the right panel shows available ones. Click the < button to add a fetcher. Useful additions include:
- MAC Address – shows the hardware address (only works on your local subnet)
- MAC Vendor – identifies the device manufacturer from the MAC address
- NetBIOS Info – reveals Windows computer names and workgroups
- Web detect – checks if hosts are running a web server
Your First Network Scan
Let us scan your home network. When you open Angry IP Scanner, the IP Range fields are already populated with your local subnet—something like 192.168.1.0 to 192.168.1.255. If the range looks right, just click Start.
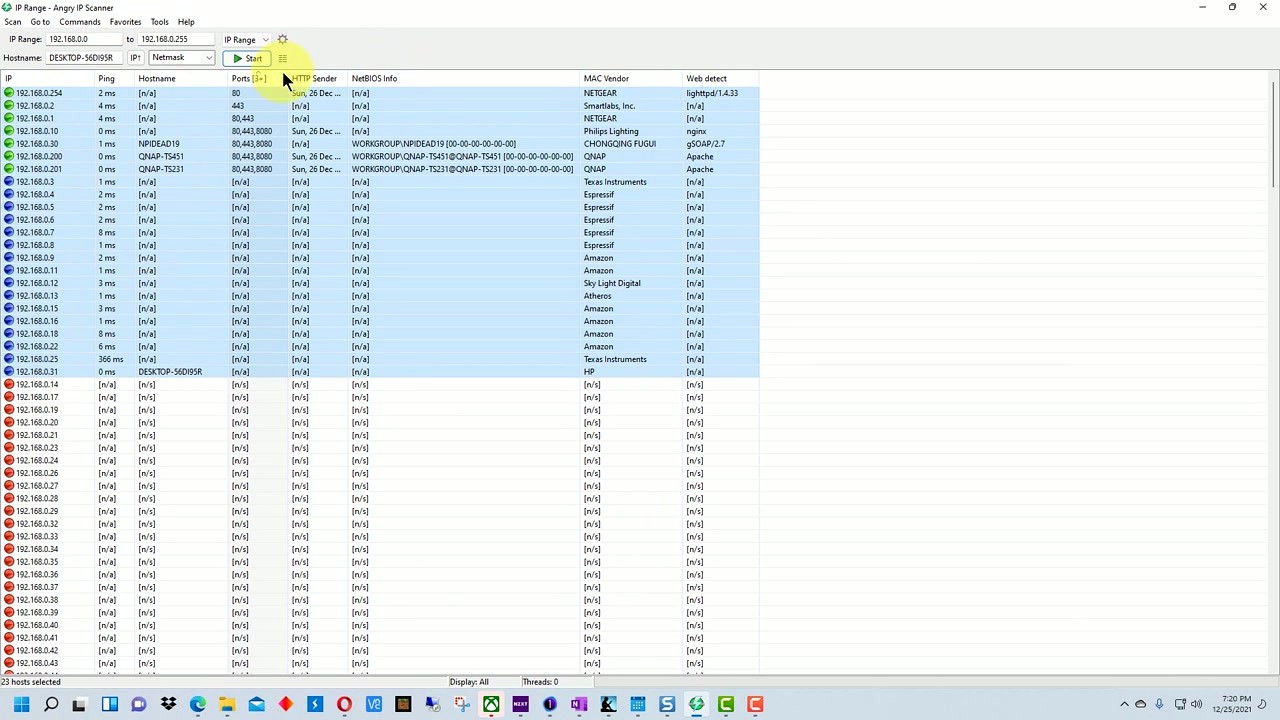
The scan typically finishes in 10-30 seconds for a /24 subnet (254 addresses). As results come in, each row gets color-coded:
- Green – Host is alive and responded to ping
- Blue – Host is alive with open ports detected
- Red – Host did not respond (dead or firewalled)
Click any column header to sort the results. Right-click a host for options like “Open in browser,” “Copy IP,” or “Show details.” The details pane shows everything the fetchers collected for that specific IP.
Scanning other ranges
You are not limited to your local network. Type any IP range into the From/To fields. You can also switch from “IP Range” mode to “Random” or use the Scan > IP Range from File option to load a text file full of IP addresses (one per line).
For CIDR notation, change the dropdown from “IP Range” to “IP Range” and type something like 10.0.0.0/16 in the From field. The To field adjusts automatically.
Saving results
After a scan, go to Scan > Export All (or press Ctrl+S). You can export to CSV, TXT, XML, or IP-Port list format. CSV works well for opening in Excel or Google Sheets. The IP-Port list format is handy if you want to feed results into another tool like Nmap for deeper analysis.
Keyboard shortcuts
| Shortcut | Action |
|---|---|
Ctrl+S | Export scan results |
Ctrl+G | Go to next alive host |
Ctrl+Shift+P | Open Preferences |
Space | Start / Stop scan |
Ctrl+N | New scan (clear results) |
Ctrl+D | Show host details |
F1 | Open help / documentation |
Tips, Tricks and Best Practices
Save your favorite ranges. If you scan the same subnets regularly, go to Favorites > Add Current. Next time, just select the range from the Favorites menu instead of typing it again. This saves a surprising amount of time if you manage multiple VLANs.
Run as Administrator (Windows) or root (Linux). Without elevated privileges, Angry IP Scanner cannot send raw ICMP packets and falls back to slower TCP-based pinging. Running as admin gets you faster, more accurate results. On Linux, either run with sudo or set the ICMP capability on the binary.
Adjust thread count for your network. Scanning a small home network with 1000 threads is overkill and can overwhelm cheap routers. Use 100-200 threads for home networks, 500-1000 for office or enterprise subnets.
Use the command-line interface for automation. Angry IP Scanner supports CLI mode for scripting. Run it like this:
The -q flag runs it quietly without opening the GUI. Combine this with a scheduled task or cron job for regular network audits.
Plugins for power users. Angry IP Scanner has a plugin system for custom fetchers written in Java. Check the GitHub wiki at github.com/angryip/ipscan/wiki for examples. You can write fetchers that pull SNMP data, check SSL certificates, or query custom services.
Ready to scan? Download Angry IP Scanner and have your first network map in minutes.
Frequently Asked Questions
Answers to the most common questions about downloading, installing, and using Angry IP Scanner on Windows, macOS, and Linux.
Is Angry IP Scanner safe to download and use?
Yes, Angry IP Scanner is safe. The project is fully open-source under the GPLv2 license, and its complete source code is publicly available on GitHub at github.com/angryip/ipscan. Anyone can inspect every line of code for themselves.
That said, some antivirus programs (McAfee, Norton, Symantec) flag it as a “potentially unwanted program” or “hacktool.” This happens because it scans network ports, which is a behavior these vendors classify as risky regardless of intent. The official FAQ on angryip.org addresses this directly and confirms there are no trojans or viruses in the installer. VirusTotal scans of the official v3.9.3 release show clean results from the majority of engines.
- Only download from the official GitHub Releases page or angryip.org – never from random third-party download sites
- The Windows installer (ipscan-3.9.3-setup.exe) is about 45 MB and bundles Java 17
- If your antivirus deletes it, add an exception for ipscan.exe after verifying the download hash
- The standalone portable .exe does not modify your registry or install background services
Pro tip: Hunters International, a ransomware group, ran fake Google ads in 2024 disguising malware as Angry IP Scanner. Always double-check that the download URL points to github.com/angryip/ or angryip.org before clicking.
For a direct, verified download link, visit our Download section.
Is Angry IP Scanner legal to use?
Yes, Angry IP Scanner is legal to download and use. It is a legitimate network administration tool distributed under the GPLv2 open-source license, used by IT professionals, sysadmins, and security researchers worldwide. Banks, government agencies, and large enterprises use it for routine network auditing according to the official website.
The legality depends on how and where you use it. Scanning your own network or a network you have authorization to test is perfectly legal in virtually every jurisdiction. Scanning networks you do not own or have permission to scan can violate computer misuse laws like the US Computer Fraud and Abuse Act (CFAA) or the UK Computer Misuse Act 1990.
- Always get written permission before scanning networks that belong to someone else
- Corporate environments typically require approval from the IT security team
- Many penetration testing contracts specifically list Angry IP Scanner as an approved tool
- Educational and home network scanning for your own devices is fine
Pro tip: If you work in a corporate environment with endpoint detection (CrowdStrike, SentinelOne), let your security team know before running the scanner. Tools like CrowdStrike can flag port scanning as a “PUP” event and trigger alerts to your SOC team.
Check our Features section to understand what the scanner actually does on your network.
Where is the official safe download for Angry IP Scanner?
The two official sources are the project website at angryip.org/download and the GitHub Releases page at github.com/angryip/ipscan/releases. Both point to the same files hosted on GitHub.
There are dozens of third-party sites (Softonic, FileHorse, CNET Download, etc.) that repackage the installer. Some of these are fine, but others bundle adware or wrap the download in their own installer. In 2024, the Hunters International ransomware group ran paid Google ads for “Angry IP Scanner download” that led to a trojanized version called SharpRhino. The fake sites looked nearly identical to the real one.
- Official download URL always starts with
github.com/angryip/ipscan/releases/download/ - The v3.9.3 Windows installer filename is
ipscan-3.9.3-setup.exe - The portable 64-bit Windows executable is
ipscan-win64-3.9.3.exe - On macOS, use the ARM zip for M1/M2/M3/M4 Macs or the Intel zip for older models
- Linux users can install via .deb (Ubuntu/Debian), .rpm (Fedora/RHEL), or Flatpak from Flathub
Pro tip: You can also install on Windows via Chocolatey (choco install angryip) which verifies package checksums automatically.
We link directly to the official GitHub releases in our Download section.
Does Angry IP Scanner work on Windows 11?
Yes, Angry IP Scanner 3.9.3 works on Windows 11 (including 24H2) without any compatibility issues. It also works on Windows 10 and Windows 7. The application is built in Java with SWT for the GUI, so it runs on any Windows version that supports Java 17 or later.
The Windows installer bundles its own Java 17 runtime, so you do not need to install Java separately. The standalone .exe also includes an embedded JRE. If you use the cross-platform .jar file, you will need to install OpenJDK 17+ yourself. The last version that supported Java 8 was version 3.7.6, which is significantly older and missing many improvements.
- Windows installer with bundled Java: 45 MB download, installs to Program Files
- Portable standalone EXE: about 45 MB, no installation needed, runs from any folder or USB drive
- Cross-platform JAR: about 1 MB, but requires a separate Java 17+ installation
- Windows Defender may show a SmartScreen warning on first run since the EXE is not code-signed with an EV certificate
Pro tip: The portable version stores its preferences in a .ipscan folder next to the executable, so you can carry your scan presets on a USB drive between machines.
See our System Requirements for full hardware and OS details.
Is Angry IP Scanner compatible with macOS and Linux?
Yes, Angry IP Scanner has native builds for macOS (both Apple Silicon and Intel) and Linux (x64 and ARM). It is one of the few network scanners with true cross-platform support across all three major desktop operating systems.
On macOS, the app comes as a zip containing an application bundle. Apple Silicon Macs (M1, M2, M3, M4) should use the ARM64 build for best performance. Older Intel Macs use the x86 build. Because the app is not distributed through the Mac App Store, you will need to right-click and select “Open” on first launch, or allow it through System Settings > Privacy & Security. Some users report the app not opening on macOS Sonoma without this step.
On Linux, you have several options:
- Ubuntu/Debian/Mint: install the .deb package (
sudo dpkg -i ipscan_3.9.3_amd64.deb) - Fedora/RHEL/openSUSE: install the .rpm package
- Any distro: use the Flatpak from Flathub (
flatpak install org.angryip.ipscan) - Any distro with Java 17+: run the cross-platform .jar file directly
- Raspberry Pi and ARM devices: use the
ipscan_3.9.3_all.debpackage
Pro tip: On Linux, running as root (sudo ipscan) lets the scanner use raw ICMP packets instead of Java sockets, which produces more accurate ping results and faster scans.
Grab the right build for your OS from our Download section.
Does Angry IP Scanner require Java to be installed?
It depends on which download you choose. The Windows installer and standalone .exe both bundle Java 17, so no separate installation is needed. The cross-platform .jar file requires you to have Java 17 or newer already installed on your system.
Angry IP Scanner is written in Java and uses SWT (Standard Widget Toolkit) for its graphical interface. This is what makes it cross-platform, but it also means the application needs a Java runtime to execute. The bundled versions include a stripped-down JRE that only contains what the scanner needs, keeping the overall size around 45 MB. The .jar file itself is roughly 1 MB since it expects your system Java installation.
- Windows installer (recommended): Java 17 bundled, no extra setup
- Windows portable EXE: Java 17 bundled, runs standalone
- macOS .zip: Java runtime included in the app bundle
- Linux .deb/.rpm: Java dependency handled by the package manager
- Cross-platform .jar: requires OpenJDK 17+ (install via
apt install openjdk-17-jreor your package manager)
Pro tip: If you get the error “A JNI error has occurred” or “Unsupported class file version,” it means your installed Java version is too old. Run java -version in your terminal to check. You need at least version 17. The last release supporting Java 8 was v3.7.6.
See our Getting Started guide for step-by-step installation instructions.
Is Angry IP Scanner completely free?
Yes, Angry IP Scanner is 100% free. There is no paid version, no premium tier, no trial period, and no feature gating. Every feature is available to every user. The project is released under the GNU General Public License v2 (GPLv2), which means you can also freely modify and redistribute it.
The developer, Anton Keks (co-founder of Codeborne, an Estonian software company), maintains the project primarily on GitHub. The project has been open-source since its early versions and has accumulated over 4,900 stars on GitHub. Funding comes from donations and the developer’s own time. Unlike Advanced IP Scanner (owned by Famatech, the company behind Radmin), there is no commercial entity selling a paid version alongside a free one.
- No ads, no nag screens, no “upgrade to Pro” prompts
- All features (port scanning, MAC detection, export, plugins) included
- Commercial use is allowed under GPLv2
- Source code available for auditing and custom builds
Pro tip: If you want to support the project, the official website has a donate page. But there is zero obligation, and the software works identically whether you donate or not.
Download the full-featured scanner from our Download section.
Can I use Angry IP Scanner for commercial or enterprise purposes?
Yes. The GPLv2 license explicitly allows commercial use. You can use Angry IP Scanner in your company’s IT department, in a managed service provider environment, during paid security audits, or any other commercial context without paying a license fee.
The GPLv2 license only requires that if you modify the source code and distribute your modified version, you must also release those modifications under GPLv2. Simply using the unmodified software for any purpose, including commercial network scanning, has no restrictions. Many IT service providers, banks, and government agencies use Angry IP Scanner as part of their standard toolkit according to the project’s own description.
- Using it internally at a company: allowed, no restrictions
- Using it during paid client engagements (pentesting, IT audits): allowed
- Bundling it in a commercial product: allowed, but your bundle must also be GPLv2
- Modifying and distributing: allowed, but you must share your source code changes
Pro tip: For enterprise environments with strict software approval processes, point your compliance team to the GitHub repository and the GPLv2 license file. The open-source nature actually makes compliance easier than proprietary tools since the code is auditable.
Learn more about what the scanner can do in our Features overview.
How do I install Angry IP Scanner on Windows step by step?
Installation on Windows takes about two minutes. Download the installer from the official GitHub releases page, run it, and you are ready to scan.
The Windows installer (ipscan-3.9.3-setup.exe) is a standard NSIS installer that bundles Java 17 so you do not need to install Java separately. The total download is about 45 MB. If you prefer not to install anything, grab the standalone portable executable instead.
- Download
ipscan-3.9.3-setup.exefrom our Download section or from github.com/angryip/ipscan/releases - If Windows Defender SmartScreen pops up, click “More info” then “Run anyway” – this happens because the executable is not EV code-signed
- Run through the installer – choose your install directory (default is fine) and whether to create a desktop shortcut
- Launch Angry IP Scanner from the Start Menu or desktop shortcut
- The default IP range will auto-detect your local subnet. Click “Start” to run your first scan
Pro tip: If you want the portable version instead, download ipscan-win64-3.9.3.exe and put it anywhere you like. It runs without installation and stores settings in a .ipscan folder next to the executable. Great for USB drives and shared IT toolkits.
For a more detailed walkthrough, check our Getting Started guide.
Angry IP Scanner portable vs installer – which should I choose?
Choose the installer if you want a standard Windows experience with Start Menu shortcuts and automatic updates. Choose the portable version if you work across multiple machines or want zero footprint on the system.
Both versions are functionally identical. Same scanning engine, same features, same version (3.9.3). The difference is how they are packaged and where they store their configuration.
- Installer (
ipscan-3.9.3-setup.exe): installs to Program Files, creates Start Menu entry, stores preferences in your user profile folder (%APPDATA%), appears in Add/Remove Programs for clean uninstall - Portable (
ipscan-win64-3.9.3.exe): single executable, no installation, stores preferences in a.ipscanfolder next to the EXE, leaves nothing behind when deleted
IT professionals and sysadmins typically prefer the portable version because they can keep it on a USB drive alongside other diagnostic tools. Home users who only scan their own network usually prefer the installer for convenience.
Pro tip: The portable version from PortableApps.com wraps the official release in their launcher format, which adds a consistent interface with other portable apps. But it is the same scanner underneath.
Both versions are available in our Download section.
How to install Angry IP Scanner on Ubuntu or Debian Linux?
On Ubuntu and Debian, download the .deb package and install it with dpkg. The whole process takes about 30 seconds from a terminal.
The .deb package handles Java dependencies through your system package manager. If you do not have Java 17+ installed, the package manager will pull it in as a dependency. The x86_64 .deb is about 1.5 MB since it relies on your system Java rather than bundling its own.
- Download the .deb file:
wget https://github.com/angryip/ipscan/releases/download/3.9.3/ipscan_3.9.3_amd64.deb - Install it:
sudo dpkg -i ipscan_3.9.3_amd64.deb - If dependency errors appear:
sudo apt-get install -f - Launch from your application menu or type
ipscanin the terminal
Alternatively, Angry IP Scanner is available on Flathub: flatpak install flathub org.angryip.ipscan. The Flatpak version bundles its own runtime, so Java compatibility is not a concern. For Raspberry Pi or other ARM devices, use the ipscan_3.9.3_all.deb architecture-independent package.
Pro tip: Run with sudo ipscan to enable raw ICMP ping. Without root, the scanner falls back to Java-based TCP pings which are slower and sometimes report all hosts as alive.
See our Getting Started guide for detailed platform-specific instructions.
Why does Angry IP Scanner show all hosts as alive?
This is one of the most commonly reported issues, especially on Windows. It happens when the scanner cannot use proper ICMP ping and falls back to TCP-based probing, which can get false positives from firewalls and routers that respond to all TCP connections.
The root cause is usually the “Combined UDP+TCP” scanning method combined with how Windows handles raw sockets. Windows restricts raw socket access for non-administrator users, and some router/firewall configurations (especially VPN gateways like Twingate or Tailscale) respond to TCP probes on every IP in the range.
- Run Angry IP Scanner as Administrator (right-click, “Run as administrator”) to enable proper ICMP ping
- Go to Tools > Preferences > Scanning tab
- Change the “Pinging method” from “Combined UDP+TCP” to “Windows-native” or “ICMP” if available
- Under the Ports tab, increase the port timeout from the default 3000ms to 5000ms if your network is congested
- Uncheck “Scan dead hosts” if you only want to see active devices
Pro tip: On Linux, running as root (sudo ipscan) avoids this problem entirely since Linux grants raw socket access to root. On Windows, even running as admin may not fully solve it on some corporate networks with aggressive firewalls.
Learn about all available scanning options in our Features section.
Angry IP Scanner is running slow – how do I speed it up?
Slow scans are almost always caused by timeout settings or thread count being too conservative for your network. Adjusting two settings in the Preferences dialog can cut scan time from minutes to seconds.
By default, Angry IP Scanner waits 3 seconds for each host to respond before moving on, and it limits the number of simultaneous threads. On a /24 subnet (254 hosts), those defaults work fine. But if you are scanning a /16 (65,534 hosts) or larger range, the defaults will make the scan crawl.
- Open Tools > Preferences > Scanning tab
- Increase “Max threads” from the default to 500 or even 1000 (the scanner can handle it on modern hardware)
- Reduce “Ping timeout” to 1000ms or even 500ms if you are on a fast local network
- Under the Ports tab, reduce “Port timeout” to 2000ms if you do not need deep port scanning
- Disable fetchers you do not need (Tools > Fetchers) – each enabled fetcher adds a lookup per host
On a typical /24 home network with default settings, a scan takes 15-30 seconds. With optimized settings (500 threads, 1000ms timeout), the same scan finishes in 3-5 seconds. Scanning speed also depends on whether your DNS server is fast, since hostname resolution adds latency per host.
Pro tip: If you only need to find alive hosts and do not care about hostnames or ports, disable all fetchers except “Ping.” This cuts scan time dramatically on large ranges.
For more configuration details, see our Getting Started guide.
Angry IP Scanner won’t open on macOS – how to fix it?
This happens because macOS Gatekeeper blocks apps that are not from the Mac App Store or identified developers. You need to explicitly allow it through the security settings.
Apple’s security model quarantines downloaded applications by default. Since Angry IP Scanner is distributed as a zip file from GitHub rather than through the Mac App Store, macOS treats it as an unverified application. This affects macOS Monterey, Ventura, Sonoma, and Sequoia. Multiple Reddit users have reported the app icon bouncing once in the Dock and then nothing happening.
- Extract the zip file (double-click it in Finder)
- Do NOT double-click the app to launch it the first time
- Instead, right-click (or Control-click) on the Angry IP Scanner app icon
- Select “Open” from the context menu
- A dialog will appear saying the app is from an unidentified developer – click “Open” to confirm
- After this first launch, you can open it normally going forward
If that does not work, go to System Settings > Privacy & Security, scroll down, and you should see a message about Angry IP Scanner being blocked. Click “Open Anyway.” On older macOS versions, this is under System Preferences > Security & Privacy > General.
Pro tip: Make sure you downloaded the correct build for your Mac. M1/M2/M3/M4 Macs need the ARM64 build (ipscan-macArm64-3.9.3.zip). Older Intel Macs need the x86 build (ipscan-macX86-3.9.3.zip). Using the wrong architecture will fail silently on some macOS versions.
Visit our Download section for the correct macOS build.
How do I update Angry IP Scanner to the latest version?
Angry IP Scanner does not auto-update. You need to download the new version and install it over the old one. The process takes about a minute.
There is no built-in auto-updater in version 3.9.3 (released November 2025). When a new version comes out, you will need to visit the download page, grab the new installer or portable executable, and replace your current installation. The installer handles this cleanly – it will overwrite the old version while keeping your preferences intact. Your saved favorites, fetcher configuration, and scan presets are stored in your user profile, not in the application folder, so they survive updates.
- Check your current version: Help > About (or look at the title bar)
- Visit github.com/angryip/ipscan/releases to see the latest release
- Download the same package type you already have (installer or portable)
- If using the installer: run it and it will update in place
- If using the portable version: replace the old .exe file with the new one
Pro tip: Watch the GitHub repository (click the “Watch” button and select “Releases only”) to get email notifications when a new version drops. Releases are infrequent (months between updates), so you will not get spammed.
Grab the latest version from our Download section.
What changed in Angry IP Scanner 3.9.3?
Version 3.9.3, released on November 10, 2025, is primarily a maintenance release that updates the bundled Java runtime and fixes platform-specific bugs. It builds on the 3.9.x series that moved the minimum Java requirement from Java 8 to Java 17.
The 3.9.x line brought several significant changes compared to the older 3.8.x and 3.7.x versions. The move to Java 17 improved memory handling, startup speed, and macOS compatibility (especially for Apple Silicon). If you are upgrading from 3.7.6 or earlier (the last Java 8 version), you will notice faster scans and a more responsive interface on modern hardware.
- Updated bundled Java runtime for better security and performance
- Native Apple Silicon (ARM64) build for M-series Macs
- Bug fixes for hostname resolution on certain network configurations
- Flatpak support on Linux for easier cross-distribution installation
- The cross-platform .jar still works for anyone who wants to bring their own Java runtime
Pro tip: If you are still running version 3.7.6 because your system only has Java 8, consider upgrading both Java and the scanner. Java 8 reached end of public updates in 2019, and many security fixes since then only apply to Java 11+.
Download the latest version from our Download section.
Angry IP Scanner vs Advanced IP Scanner – which is better?
It depends on what you need. Angry IP Scanner is cross-platform, open-source, and portable. Advanced IP Scanner is Windows-only, closed-source, but has a few extra features like remote desktop integration and wake-on-LAN.
Advanced IP Scanner is made by Famatech, the same company behind Radmin (a remote desktop tool). It has tighter Windows integration – you can RDP into discovered hosts, access shared folders, and remotely shut down machines directly from the scan results. Angry IP Scanner does not have these Windows-specific features, but it runs on macOS and Linux, which Advanced IP Scanner does not. A relevant security note: Advanced IP Scanner is developed by a Russia-based company, which some organizations now flag in their procurement policies.
- Cross-platform: Angry IP Scanner (Win/Mac/Linux) vs Advanced IP Scanner (Windows only)
- License: Angry IP Scanner (GPLv2 open-source) vs Advanced IP Scanner (freeware, closed-source)
- Remote management: Advanced IP Scanner has RDP, SSH, and wake-on-LAN built in; Angry IP Scanner does not
- Portability: both offer portable versions, but Angry IP Scanner’s is lighter
- Plugin system: Angry IP Scanner supports third-party fetcher plugins; Advanced IP Scanner does not
- Export formats: Angry IP Scanner exports to CSV, TXT, XML, IP-Port lists; Advanced IP Scanner exports to CSV and HTML
Pro tip: Many sysadmins keep both. Use Angry IP Scanner for quick, cross-platform network discovery. Use Advanced IP Scanner when you need to RDP into machines or wake up workstations remotely in a Windows-heavy environment.
Compare capabilities in detail in our Features section.
Angry IP Scanner vs Nmap – what are the differences?
Nmap is far more powerful and complex. Angry IP Scanner is far simpler and faster to get started with. They serve different purposes and different skill levels.
Nmap (Network Mapper) is the industry-standard network scanning tool used by security professionals. It has a scripting engine (NSE) with thousands of scripts, OS fingerprinting, service version detection, and stealth scanning modes. Angry IP Scanner does none of that. What Angry IP Scanner does is fast ping sweeps and basic port scans with a clean GUI, no configuration required. On a Reddit thread in r/PLC, one user put it well: “AngryIP does everything you need if all you want to do is ping scan a network to find alive hosts.”
- Learning curve: Angry IP Scanner (5 minutes) vs Nmap (weeks to master)
- GUI: Angry IP Scanner has a native GUI; Nmap has Zenmap (a separate frontend) or the command line
- OS fingerprinting: Nmap can identify operating systems; Angry IP Scanner cannot
- Scripting: Nmap has NSE (Nmap Scripting Engine) with 600+ scripts; Angry IP Scanner has a basic plugin system
- Speed for simple scans: Angry IP Scanner is faster for basic ping sweeps on smaller networks
- Service detection: Nmap can identify what software is running on open ports; Angry IP Scanner just lists open port numbers
Pro tip: Use Angry IP Scanner for quick “what is on my network right now” checks. Use Nmap when you need vulnerability scanning, OS detection, or scripted security audits. They complement each other well in a network admin’s toolkit.
See what Angry IP Scanner can do in our Features section.
How do I export scan results from Angry IP Scanner?
After a scan completes, go to File > Save As (or press Ctrl+S) to export results. Angry IP Scanner supports four export formats: CSV, TXT, XML, and IP-Port list.
The export includes all columns visible in your current scan results. If you have enabled extra fetchers (MAC address, NetBIOS name, web server detection), those columns will appear in the export too. You can also configure what to export in the save dialog: all hosts, alive hosts only, or hosts with open ports only. This filtering is useful when scanning large ranges where most IPs are dead.
- CSV: comma-separated, opens directly in Excel or Google Sheets. Best for data analysis
- TXT: tab-separated plain text. Good for quick sharing or pasting into documents
- XML: structured format suitable for parsing with scripts or importing into other tools
- IP-Port list: one IP:port pair per line. Useful as input for other scanning tools like Nmap
You can also select specific rows in the results table, right-click, and copy them to the clipboard. This works well when you just need a few entries rather than the full export.
Pro tip: Set up automatic export by going to Tools > Preferences > Display tab and enabling “Append to favorites file.” Combined with the command-line interface (ipscan -f:range 192.168.1.1 192.168.1.254 -o output.csv), you can automate recurring network audits with a scheduled task or cron job.
More usage tips in our Getting Started guide.
Can Angry IP Scanner detect MAC addresses and NetBIOS info?
Yes. MAC address detection and NetBIOS information gathering are built-in fetchers that you can enable from the Tools > Fetchers menu. They are not active by default, so you need to add them to your column list.
MAC address detection works by reading the ARP cache on your local machine. This means it only works for devices on the same Layer 2 network segment (same subnet, same broadcast domain). If you are scanning across routers or VLANs, MAC addresses will show as empty because ARP does not cross router boundaries. The NetBIOS fetcher queries Windows machines for their computer name, workgroup/domain, and currently logged-in user. This is useful for identifying which workstation belongs to which employee on a corporate LAN.
- MAC Address: works for same-subnet devices only. Shows manufacturer prefix (e.g., “Apple, Inc.” for iPhones)
- NetBIOS Computer Name: the Windows hostname of the device
- NetBIOS Workgroup: the domain or workgroup the machine belongs to
- NetBIOS User: the currently logged-in user on Windows machines
- Web Detect: checks if a web server is running on discovered hosts
To enable these, go to Tools > Fetchers, click the “+” button, and add the fetchers you want. They will appear as new columns in the scan results. You can reorder columns by dragging the column headers.
Pro tip: The MAC address OUI (Organizationally Unique Identifier, the first three octets) tells you the device manufacturer. This is a quick way to identify IoT devices, printers, and phones on your network without needing to log into each one.
Full feature breakdown in our Features section.
How do I scan specific ports with Angry IP Scanner?
Go to Tools > Preferences > Ports tab and enter the ports you want to scan in the “Port selection” field. You can specify individual ports (80, 443, 22), ranges (1-1024), or a mix (22, 80, 443, 8000-9000).
By default, Angry IP Scanner does not scan any ports. It only pings hosts to check if they are alive. To see open ports in your scan results, you need to configure the port list first. The scanner tests each specified port on every alive host using TCP connection attempts. It does not do UDP scanning, which is a significant limitation compared to Nmap.
- Open Tools > Preferences (or press Ctrl+,)
- Go to the Ports tab
- In “Port selection,” type your ports: e.g.,
22,80,443,3389,8080 - Adjust “Port timeout” if needed (default 3000ms works for most LANs)
- Click OK, then run your scan
- Open ports will appear in the “Ports” column of the results
Common ports to scan: 22 (SSH), 80 (HTTP), 443 (HTTPS), 3389 (RDP), 445 (SMB/Windows file sharing), 8080 (web proxy), 5900 (VNC). For a quick security check of your home network, scanning these seven ports on your local subnet will reveal most exposed services.
Pro tip: Scanning all 65,535 ports per host is technically possible but extremely slow. For a full port audit, use Nmap instead. Angry IP Scanner is better suited for checking a handful of specific ports across many hosts quickly.
See our Getting Started guide for a full scanning walkthrough.
Still have questions? Check the official documentation at angryip.org/faq or browse the GitHub Issues page.